Setting up a load balancer from scratch
Setup a set of VMs with one load balancer and multiple worker nodes.
TLDR NGINX is OSS for web serving, reverse proxying, caching, load balancing etc.A load balancer is the “traffic cop” sitting in front of your servers and routing client requests.
- Why a load balancer?
- Why Nginx?
- Where to get VMs?
- What we will be doing?
- How will we do this?
Why a load balancer?
- Your website is hosted on a VM.
- The VM can handle 100 users at a time.
- Suddenly your website gets 500 users in one go because Cardi B tweeted about your site.
- You now need 5 VMs to handle the requests.
- But how do you redirect your requests?
- You put a load balancer in front which redirects the client requests based on which VM is free.
Why Nginx?
NGINX is free and open sourced and widely used for web serving, reverse proxying, caching, load balancing, media streaming, and more. Also the setup is pretty straightforward.
Where to get VMs?
You can use any of the cloud providers, AWS, Azure, Google CLoud etc.
They each have some sort of free or trial program.
For this post we will be using Azure VMs.
What we will be doing?
- We will setup a VM that will act as load balancer and 2 worker VMs that host a simple webpage.
- We will use the nginx default page because i am feeling lazy.
How will we do this?
This will be the general sequence of steps.
- We setup a virtual network.
- Add 2 worker VMs to this network.
- Configure NGINX on each worker to serve a default page.
- Add a front end load balancer VM
- Expose the front end LB VM through a public IP.
- Setup NGINX to redirect traffic to worker VMs.
Lets unpack this a bit and do this one by one.
1. Setup a Virtual network
Go to the azure portal and create a new virtual network. You can follow the instructions at https://docs.microsoft.com/en-us/azure/virtual-network/quick-create-portal#create-a-virtual-network or look at the GIF below.
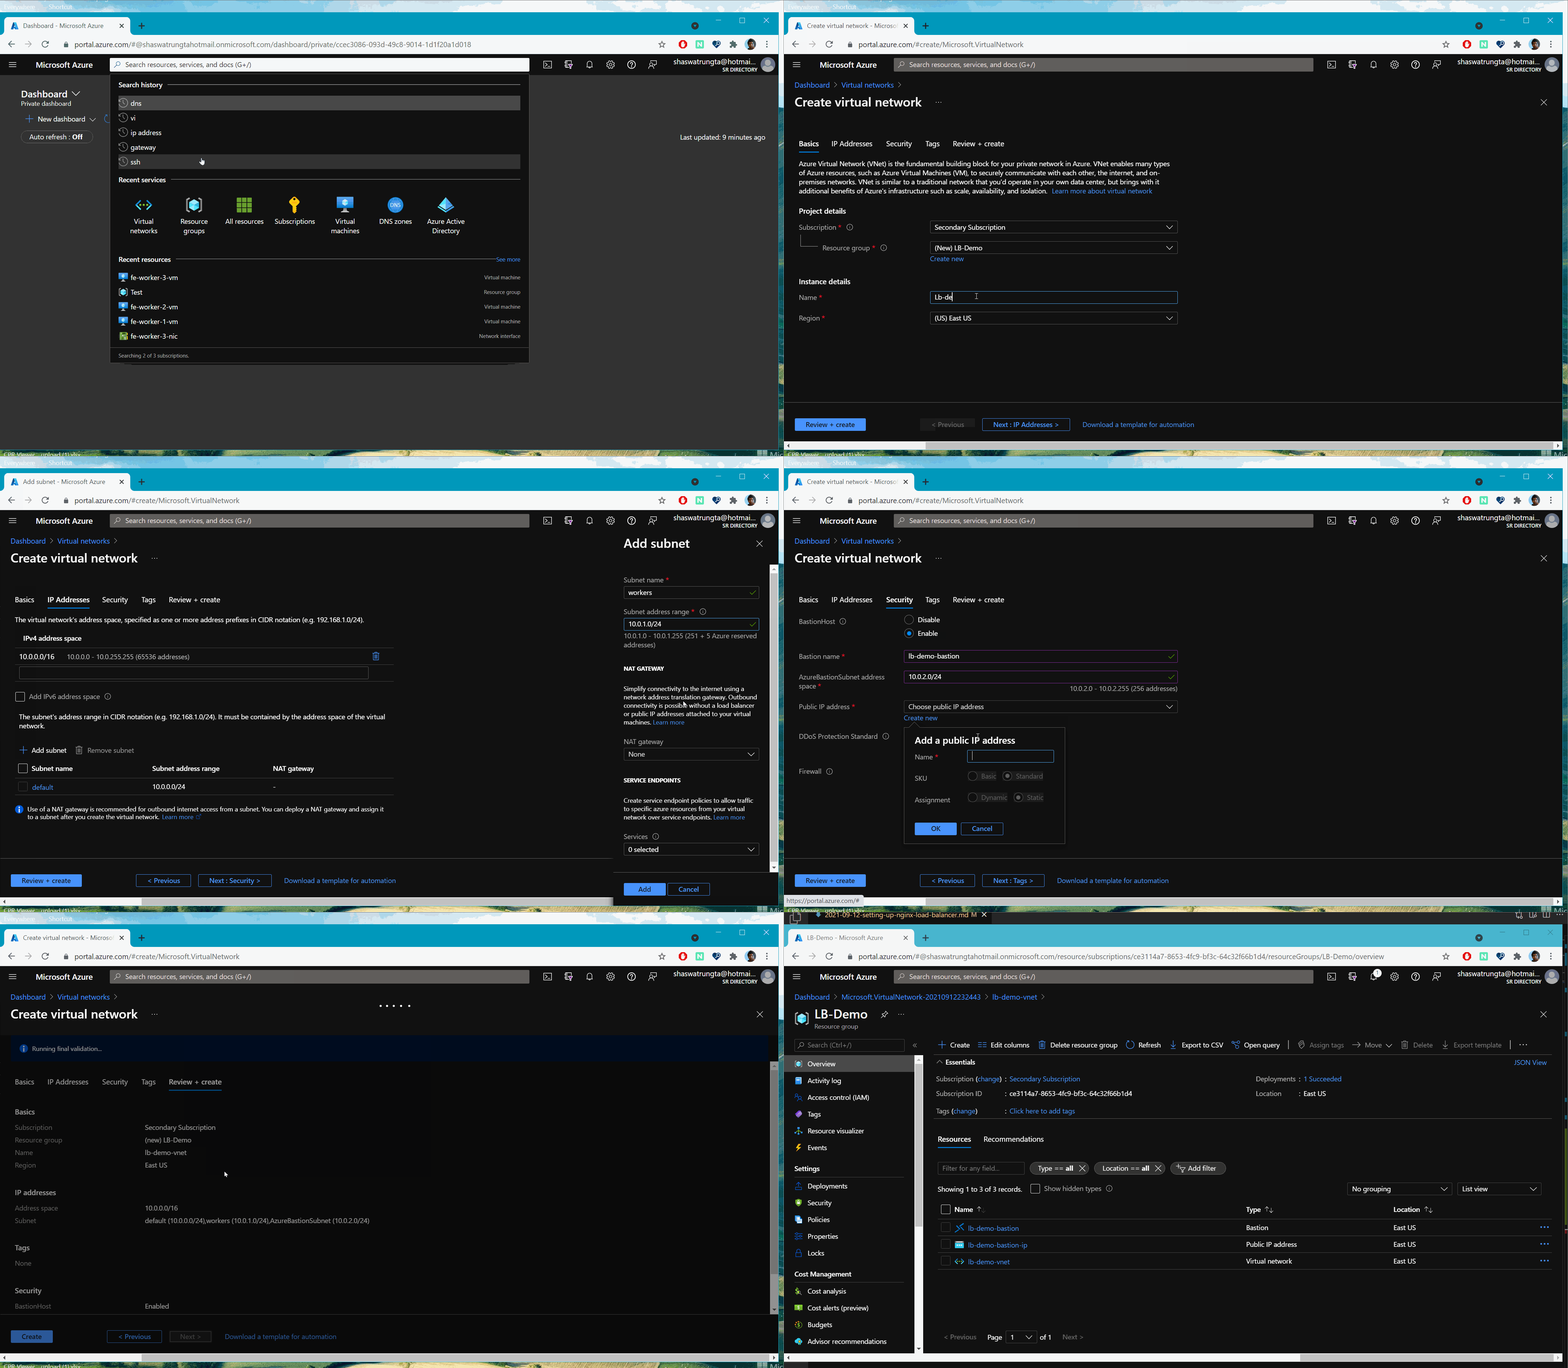
We add the Bastion host so that it is easy to login into the VMs on this network. You can read more about Bastion on https://azure.microsoft.com/en-in/services/azure-bastion.
Bastion hosts cannot be stopped like a VM. Hence they will perpually cost you money. You can choose not to add the Bastion host during the creation of the vnet and can add it later as well.
2. Add 2 worker VMs to this network.
Now that we have a network, we will add two small VMs to this network.
If you look at the GIF, we had created a subnet called workers. We will keep our worker nodes in that subnet for cleaner isolation.
You can follow the steps at https://docs.microsoft.com/en-us/azure/virtual-network/quick-create-portal#create-virtual-machines or follow the GIF below.
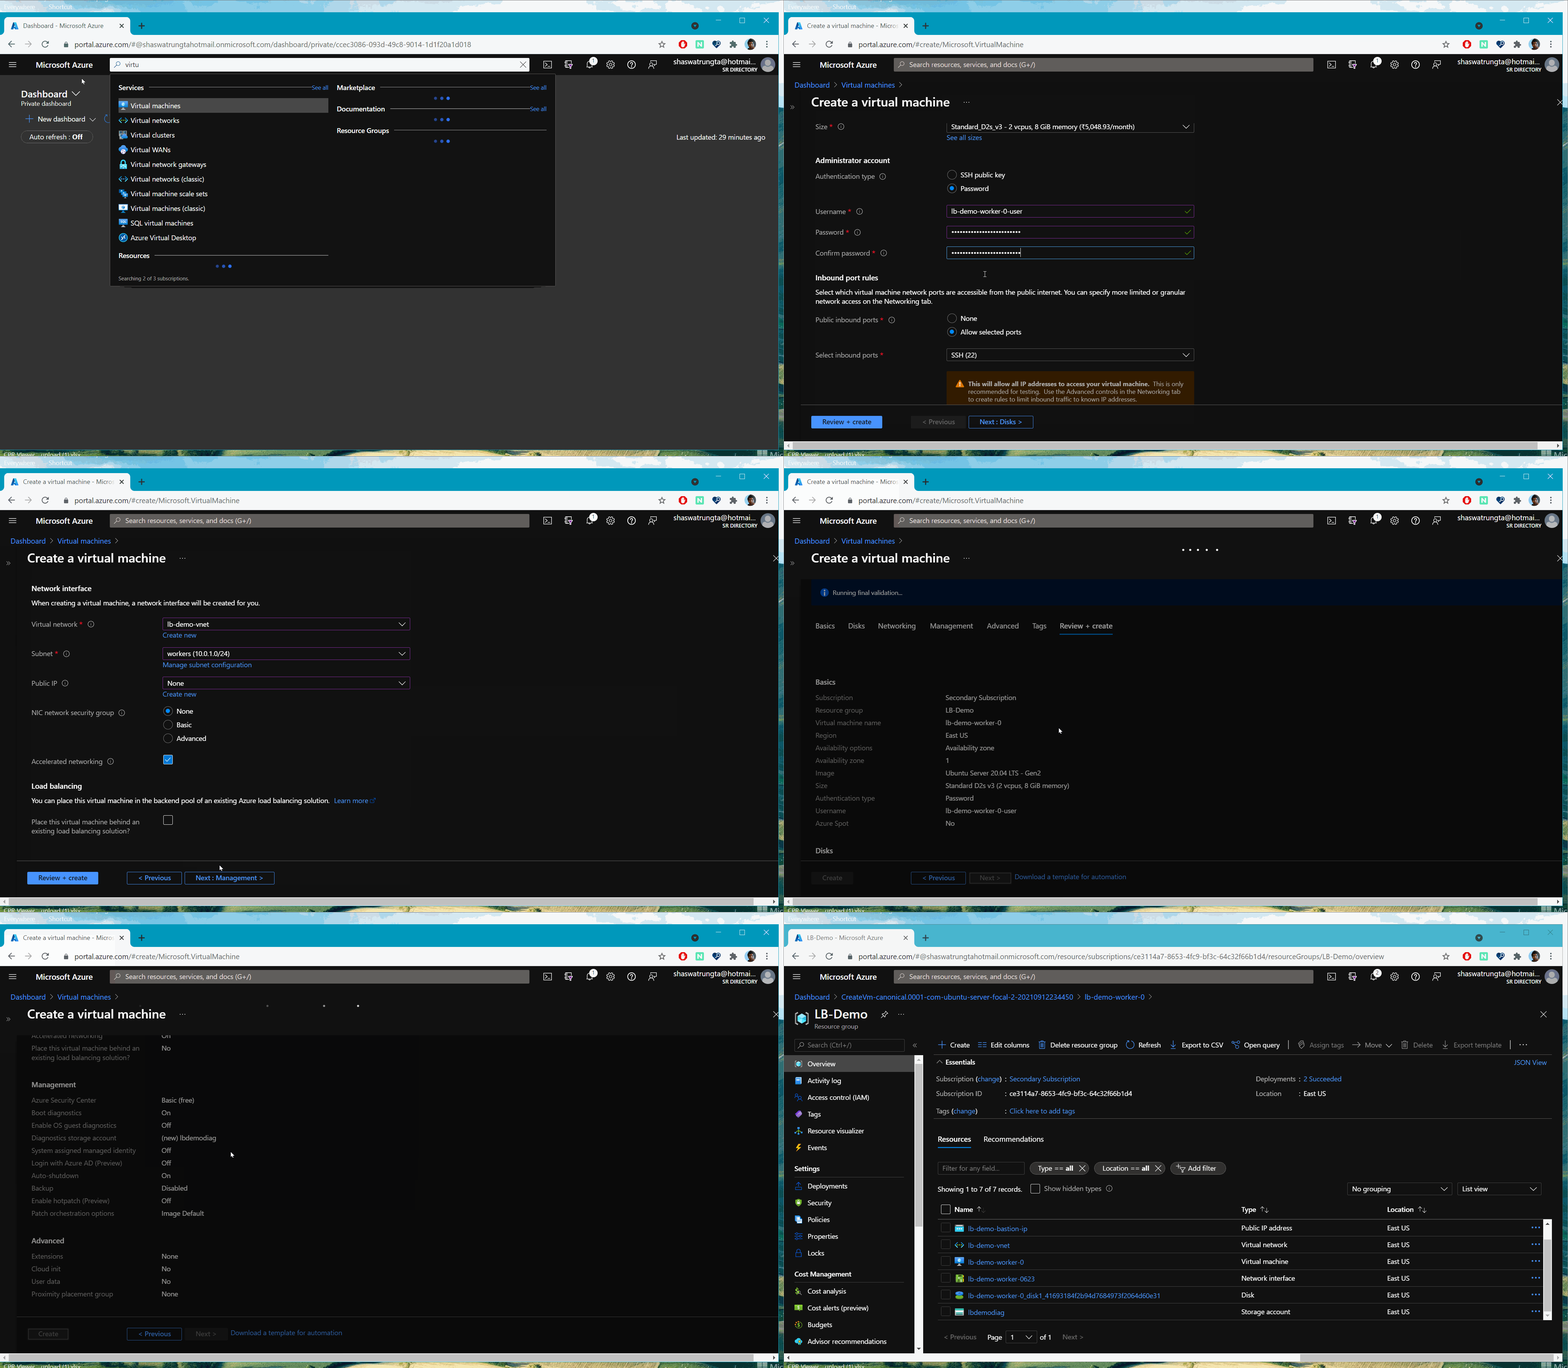
We intentionally do not assign a public ip and nsg to the VM because we dont want it accessible from the outer public internet. The idea is that all traffic that comes to these worker VMs should come via the load balancer.
Similar create one more VM called lb-demo-worker-1.
3. Configure NGINX on each worker to serve a default page.
So till now we have a virtual network that has two VMs which have no public IP. How do we connect to these VMs then? At this point traditionally you will either setup a jumpbox to connect to the network which has a public IP or assign a public IP to your worker VMs and login using that. The Bastion host lets you do the former.
To use Bastion to connect to the VM, follow the instruction at https://docs.microsoft.com/en-us/azure/bastion/tutorial-create-host-portal#connect-to-a-vm. Since we are using Linux VMs, it wont open an RDP as shown in the post, but instead will open a shell. Or you can follow the GIF below.
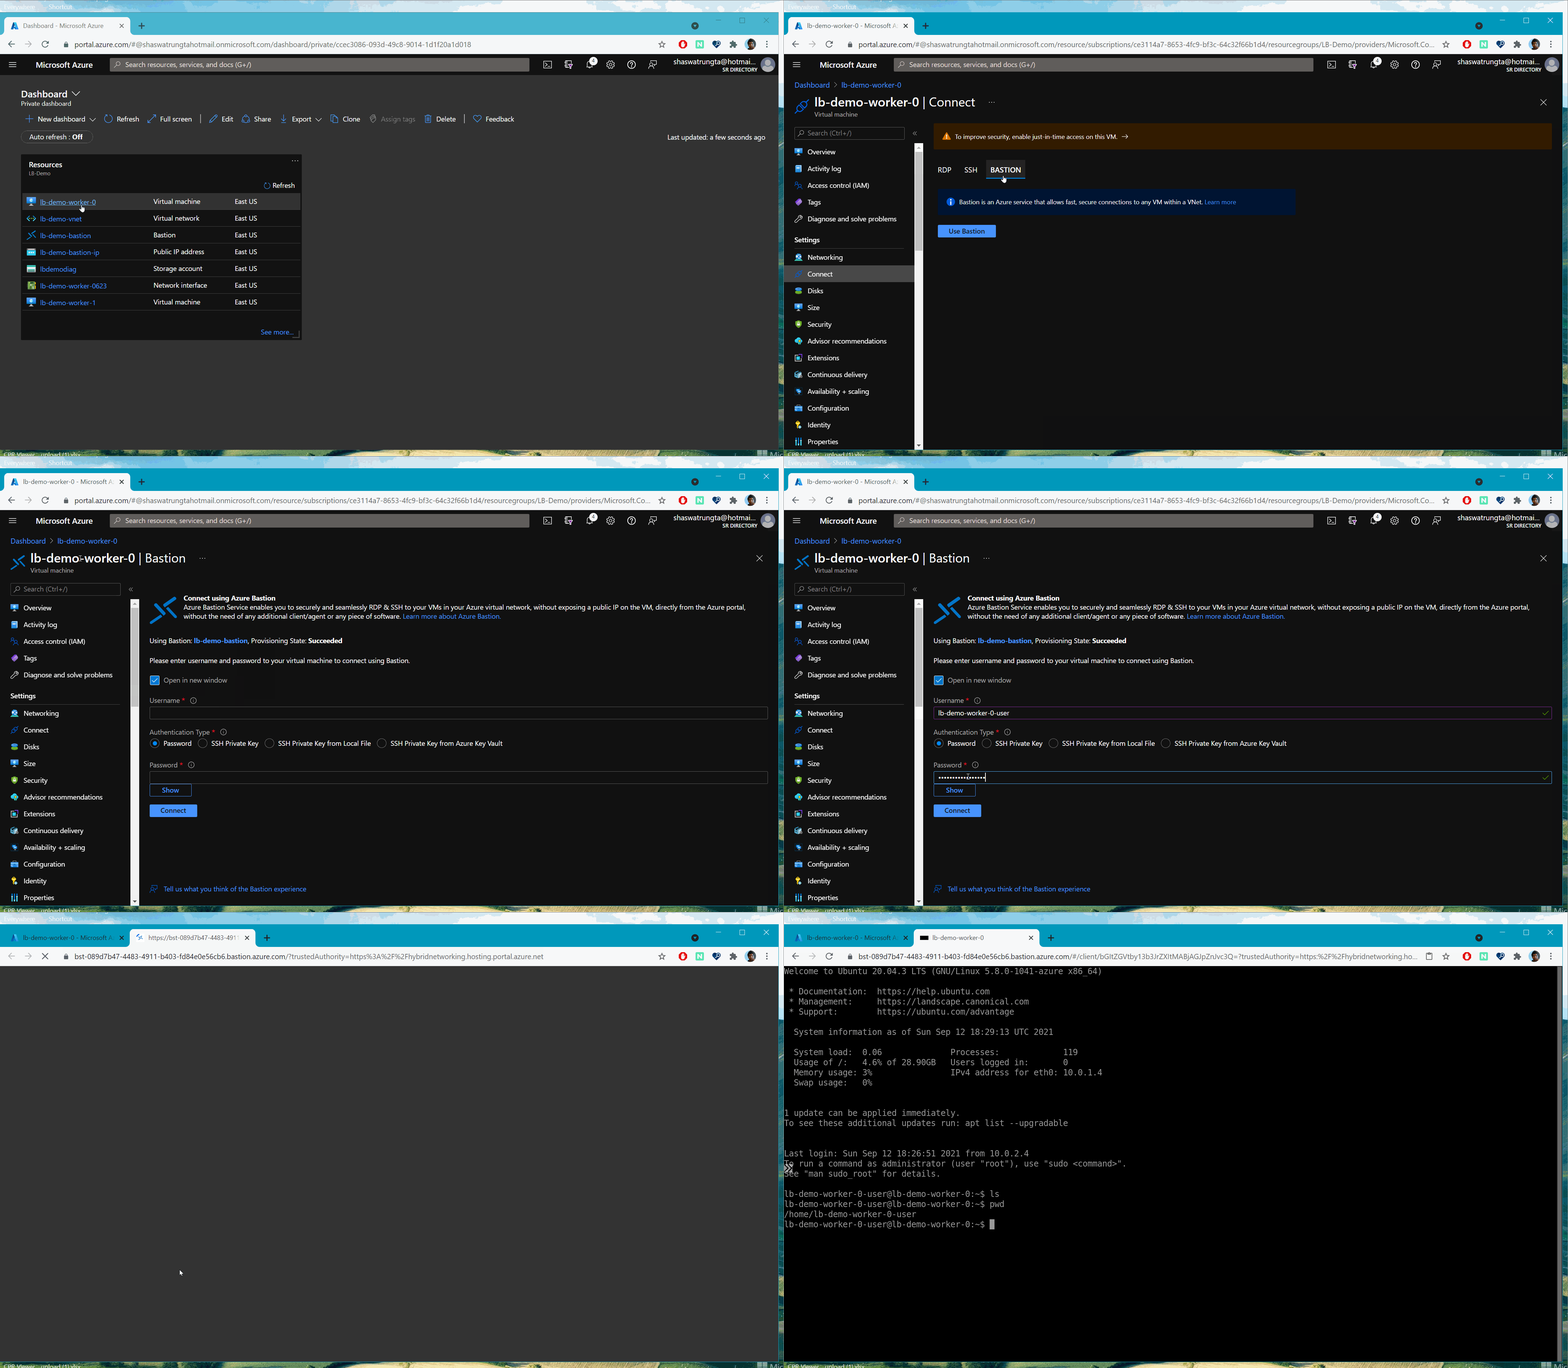
Now that we are able to connect to the VM, we will install NGINX, so that this VM can serve pages. We will use the default page itself.
In the shell type
sudo apt-get install nginx
and then press Y when prompted for confirmation.
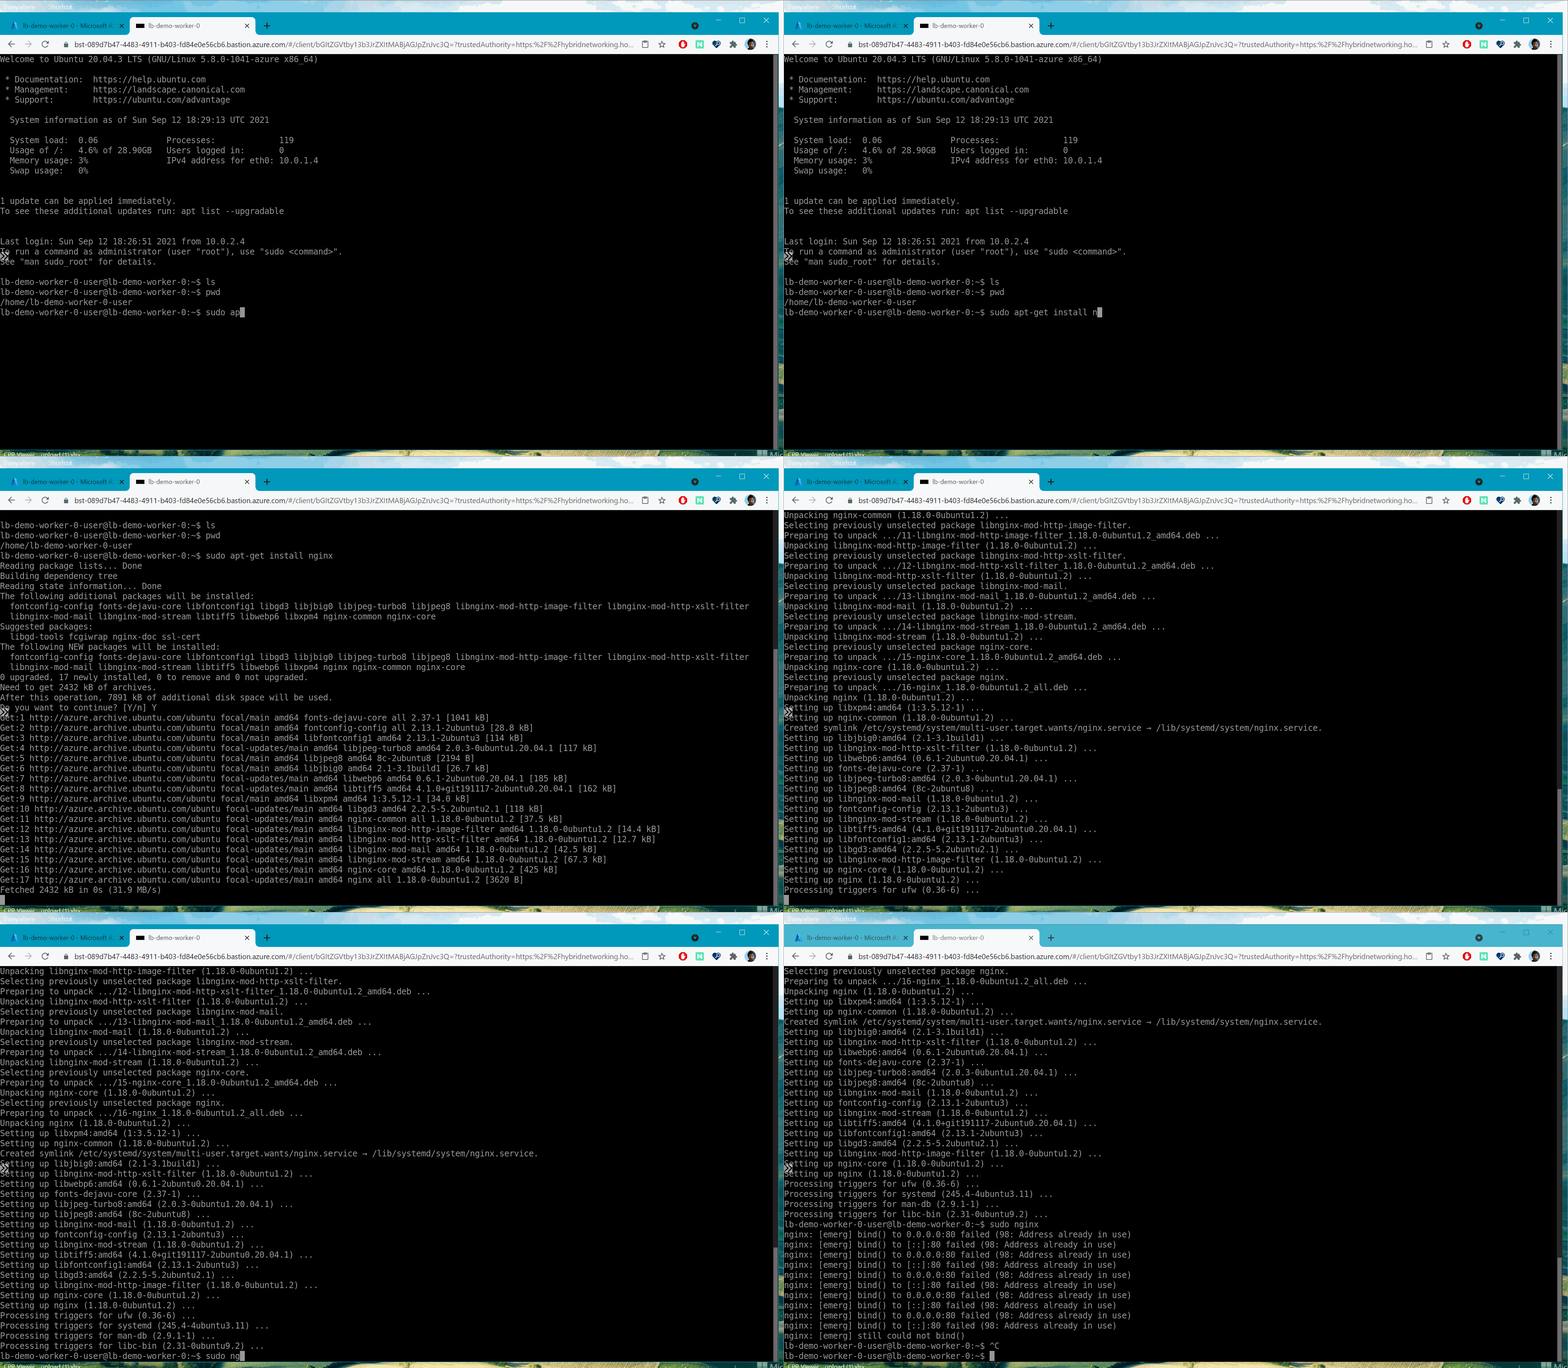
Just so that we know when the request is served by this VM, we will edit the default page a little. in the same bash window, type
cd /var/www/html
sudo vi index.debian.html
This will open the file in VI editor. Press Esc and then i to start editing the document.
I just add a new header saying that this page is coming from VM 0.
Save the file by pressing Esc and then typing :wq and pressing Enter.
To verify that the page is being served currectly, type
curl 0.0.0.0:80
This should print the contents of the html file.
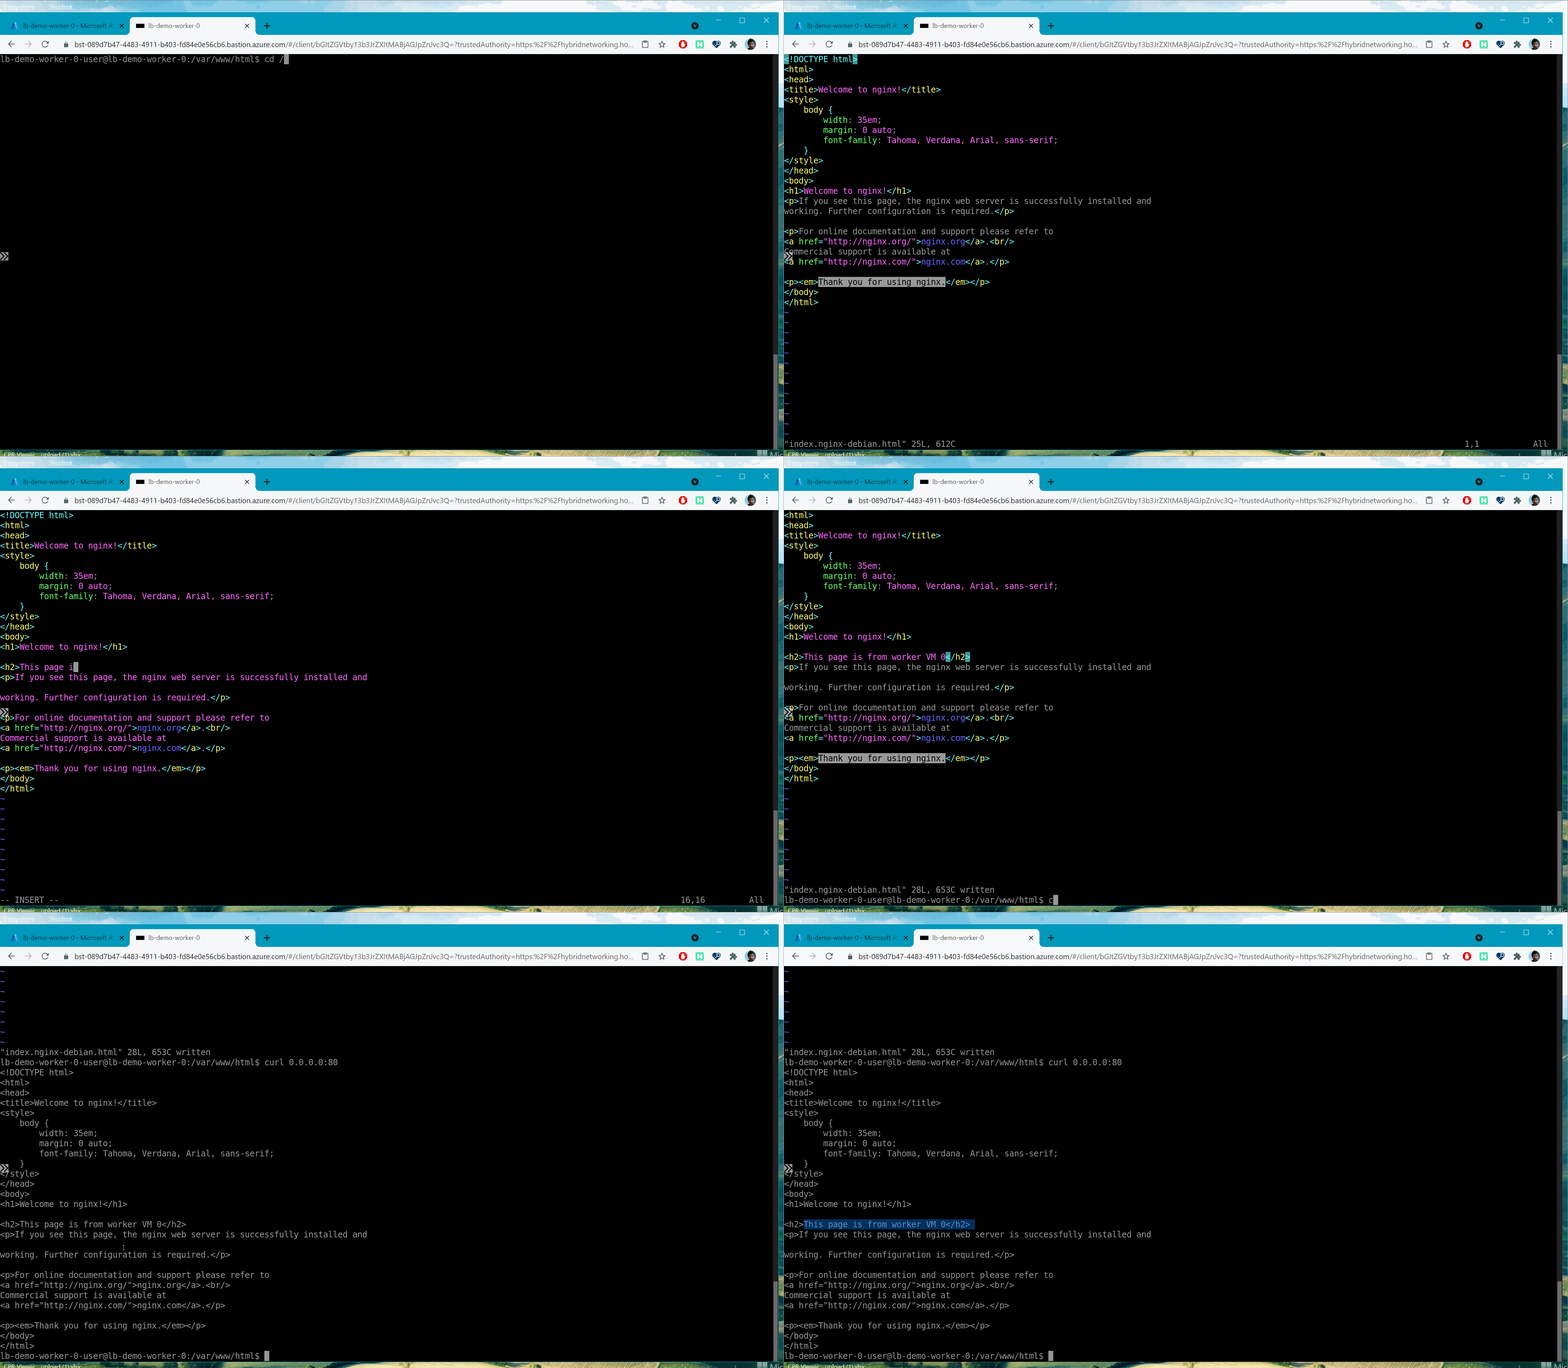
Do the same for the worker VM 1. Now we have the VMs that have the website we want to serve to users.
4. Add a front end load balancer VM
This step is not much different from creating worker vms. The key difference is that this VM will have a public IP and a network security group as well.
NSG is Azure’s way of configuring what traffic is allowed to the VM.
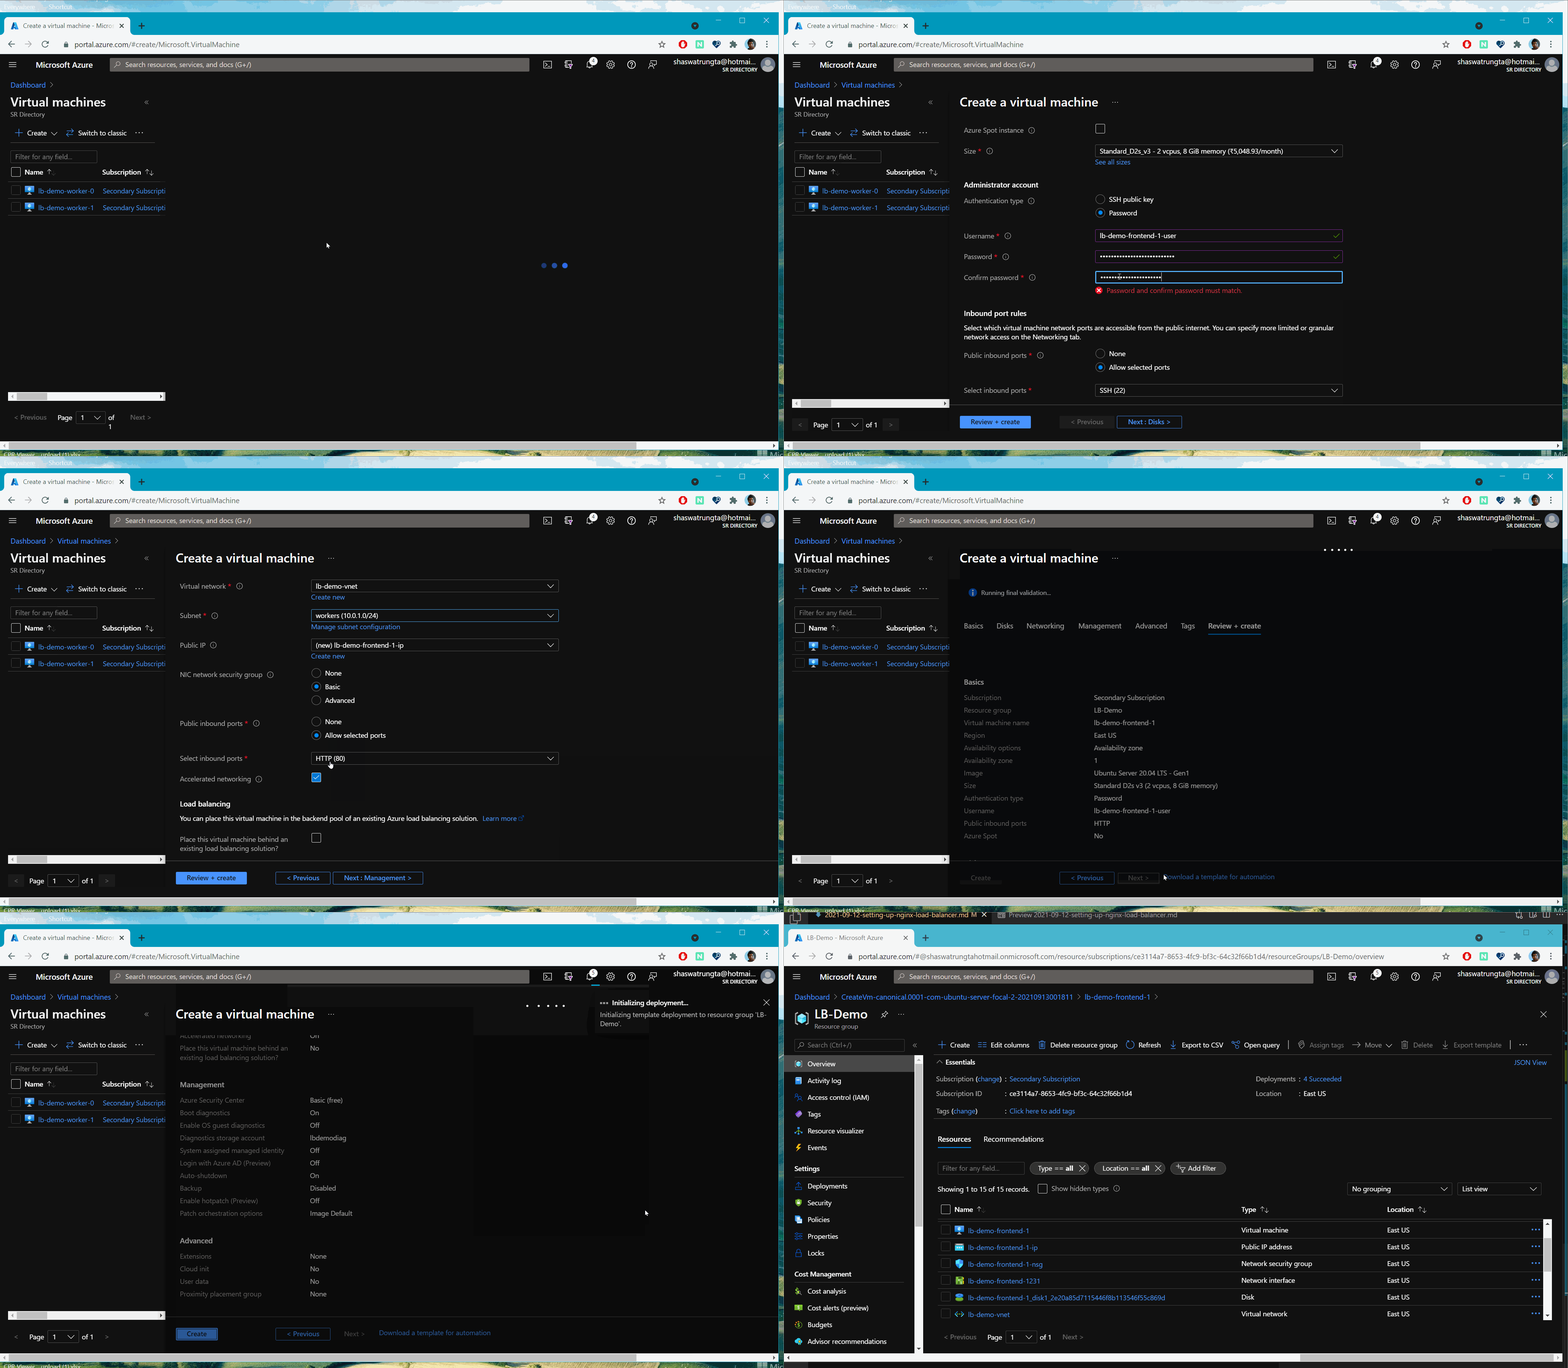
5. Expose the front end LB VM through a public IP.
You will notice that we have intentionally kept the port 80 open so that we can receive the HTTP traffic on this VM.
We also created a public IP so that we open that IP in our browser.
You can find the IP by navigating to the virtual machine in the portal or by searching for the name you gave to the public IP when creating the VM. Mine was lb-demo-frontend-1-ip
(My assigned IP at this time was 20.51.244.165.) If you open the ip in a browser now, you wont see anything. Just an error page. Because the vm does not have the server configured.
6. Setup NGINX to redirect traffic to worker VMs.
Same as the worker nodes, we install nginx on the frontend VM. Connect to the frontend VM using bastion and run
sudo apt-get install nginx
to install nginx.
After you install nginx, if you open the public ip in your browser, you should see the default NGINX page. If that happens, it means your VM is getting requests from outer world. We just need to redirect it now.
NGINX uses config files to configure the server. In this case we need to provide a config that says “Hey for all request coming to my port 80, redirect them to the ips of my worker node.”
To do this we need to first collect the ips of our worker nodes. But we had not assigned an ip to them when creating the VM. So they dont have a public IP. Instead here we need the private IP assigned to thgem within your virtual network. Since your frontend VM is also in the same vnet, it can use these internal IPs to connect to the worker VMs. You can follow this guide https://docs.microsoft.com/en-us/azure/virtual-network/virtual-networks-static-private-ip-arm-pportal#retrieve-private-ip-address-information-for-a-vm
You can also find the private ip by going to the VM under the “Networking” section. The IP should be listed as something like.NIC Private IP: 10.0.1.5
In my case the IPs were 10.0.1.5 and 10.0.1.4.
NOw let us configure the load balancing.
6.1 Add load-balancer.config file.
Login to your front end VM using bastion and type
sudo vi /etc/nginx/conf.d/load-balancer.conf
When the file is created, press Esc and i and then insert the below config in the file.
(Paste using Shift+Insert)
and then save using Esc and then :wq + Enter
# Define which servers to include in the load balancing scheme.
# It's best to use the servers' private IPs for better performance and security.
# You can find the private IPs at your UpCloud control panel Network section.

# Ref : https://upcloud.com/community/tutorials/configure-load-balancing-nginx/
# Put this file
# sudo vi /etc/nginx/conf.d/load-balancer.conf

# Usually the next line should also be uncommented
# but the enclsoing nginx.conf already has the http top level block
# so uncommenting it here will cause an error.
# http {
   # Add the ips of the worker nodes here
   upstream backend {
      server 10.0.1.5;
      server 10.0.1.4;
   }

   # This server accepts all traffic to port 80 and passes it to the upstream.
   # Notice that the upstream name and the proxy_pass need to match.

   server {
      listen 80;
      # You can configure the different paths here to redirect traffic across different routes also
      location / {
          proxy_pass http://backend;
      }
   }
# }
The above config says
upstream backend {
  server 10.0.1.5;
  server 10.0.1.4;
}
configure an upstream called backend. The servers for this upstream are at ips 10.0.1.5 and 10.0.1.4.
if you have more worker nodes you can add their IPs here. Or you can add wildcards like 10.0.1.* to select a range.
Adding woker VMs to subnets all you to do this type of wildcard selection also.
Also
server {
      listen 80;
      # You can configure the different paths here to redirect traffic across different routes also
      location / {
          proxy_pass http://backend;
      }
   }
says that this server will listen to port 80. and for location / (which means all paths) it will pass the traffic to http:/backend.
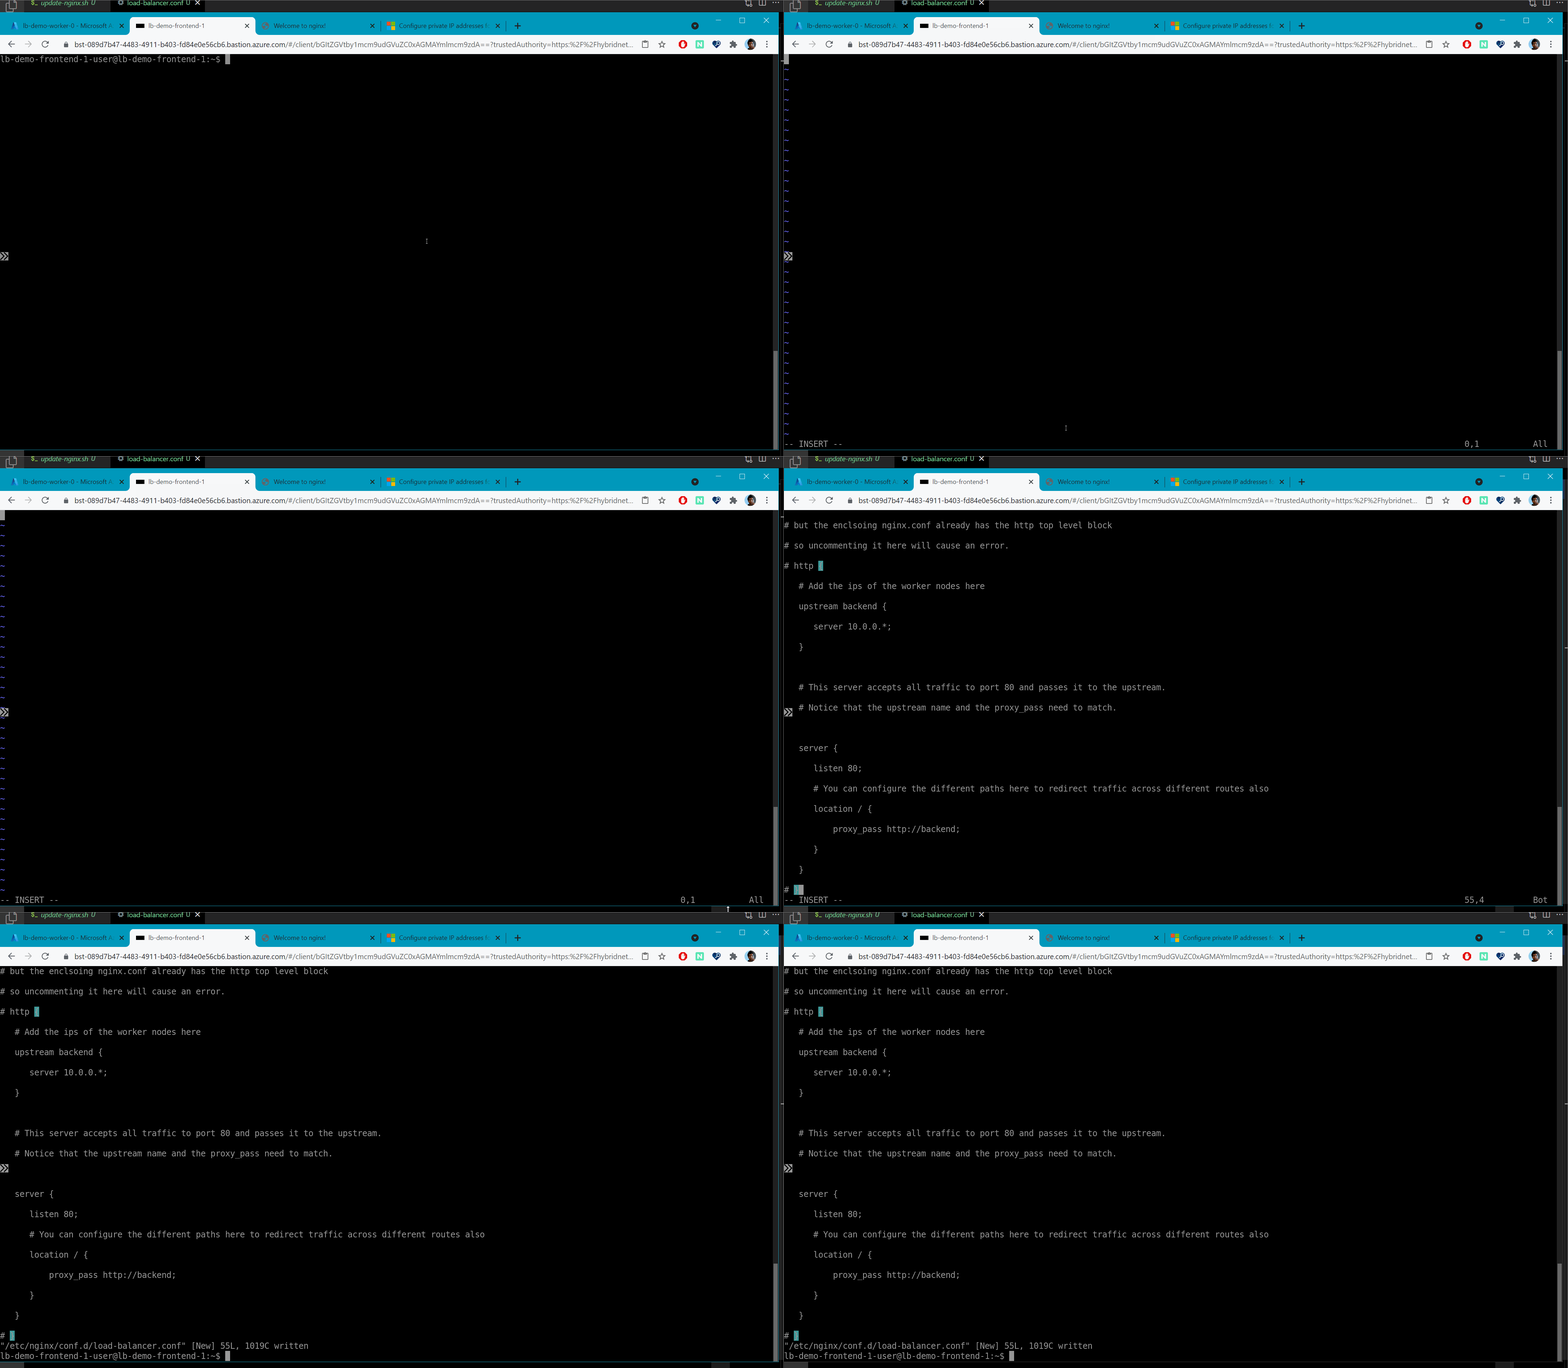
6.2 Remove default config.
By default NGINX also comes with binding for port 80. That is why you see the default nginx page when you opened the IP. We should remove that
sudo rm /etc/nginx/sites-enabled/default
6.3 Restart the nginx server.
Since we changed the routing logic, you can restart the nginx service using
sudo systemctl restart nginx
Thats it. Now open the frontned VM ip in a browser and refresh. You should alternatively see the pages from worker 0 and 1.
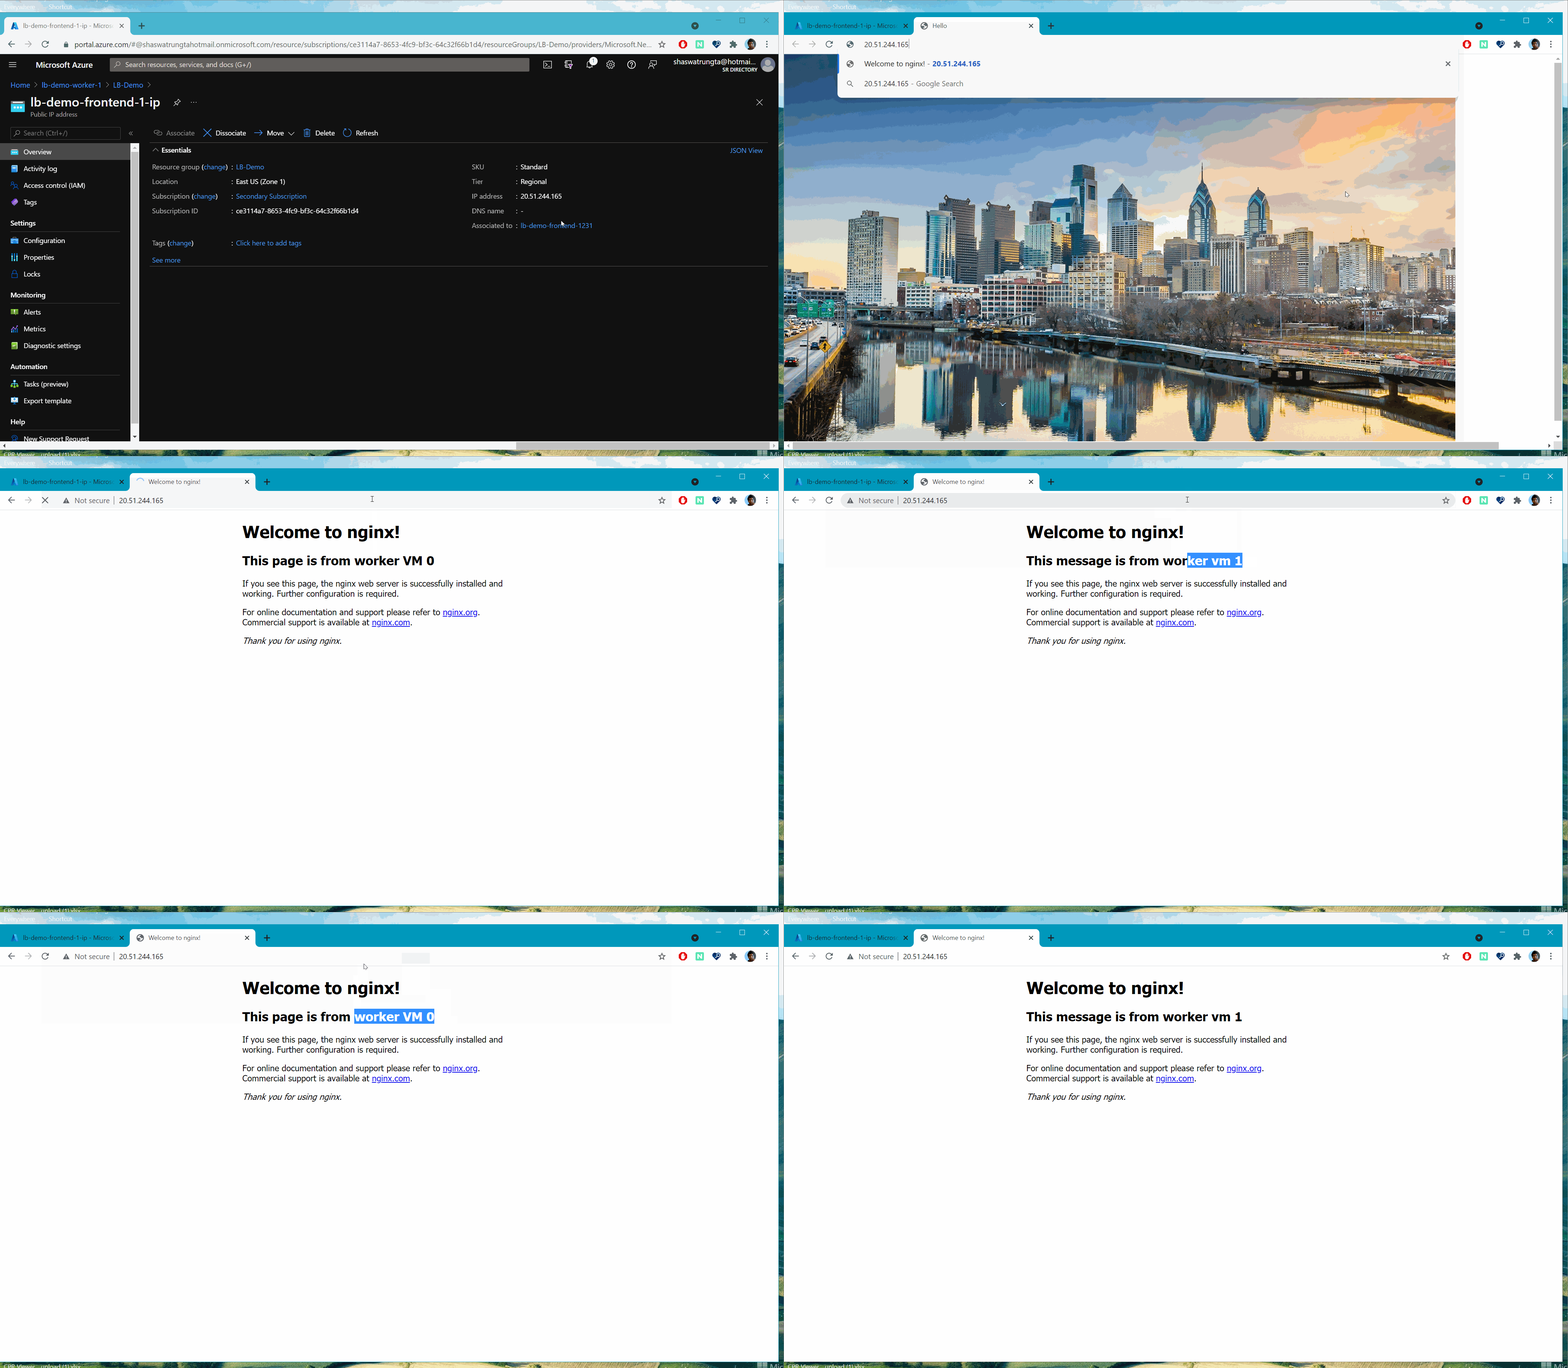 Fin.
Fin.